Note: You are the only responsible for any changes you make or attempt to make to your e-bike. The unlock of the speed limiter in public places such as streets, squares and cycle paths is FORBIDDEN BY THE LAW. Therefore it is possible to activate the unlock in private circumscribed places such as circuits, tracks and private properties. Mounting the device may void the factory warranty of the bicycle. The manufacturer declines all responsibility for any damage caused to pedal assisted bicycles on which the Levociraptor system is mounted. The manufacturer declines all responsibility for damage to persons or things caused or in any way linked to the use of Levociraptor.
In this short document I will show how to mount the Levociraptor device able to change the wheel size on the Levo 2019/2020/2021 or Kenevo 2020/2021, especially for the models which have TCU (DISPLAY) with firmware version up to 26.B and motor version uop to 7.4.2
1. Switch off the bike and disconnect the battery from the engine.
2. Remove the display on the down tube (called TCU).
3. Disconnect the green connector of the TCU and connect the Levociraptor device. There is only one possibility to connect the connectors.
4. Apply the adhesive with the Velcro on the TCU and attach the device to the Velcro attached (if it is possible). Sometime there is no space or is not so easy to install Levociraptor under the TCU with the Velcro. If this, leave the Levociraptor inside the bike tube without the Velcro.
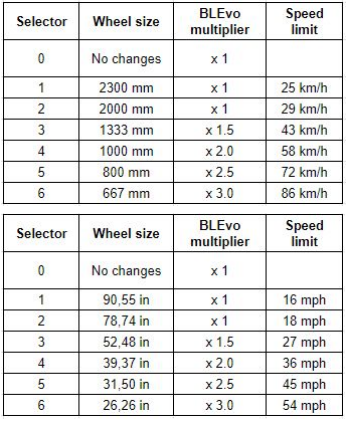
5. With a screwdriver, turn the selector and select the new wheel circumference by positioning the selector arrow on number 4 following the table below.
After selection, please tape over the selector to prevent water/moisture entering the module.
6. Insert the cables into the bike tube, close the TCU and connect the battery cable.
7. Turn the bike on and off 2 times.
8. (Optional) Configure the speed multiplier (Speed x) in BLEvo as selected in the table in order to have the correct display of the KMs done and the speed. The value of the speed limit will be automatically increased according to the selected speed multiplier. At the end, configure the real wheel size.
Note 1: Before returning the bike to service, set the selector to position 1, turn the bike off and on 2 times and remove the Levociraptor device. Then execute the TCU reset procedure (see note 4)
Note 2: To change the wheel size value once installed, just turn off the TCU, remove it from the down tube and change the value of the selector.
Note 3: From position 3 on the selector, Mission Control will always display 2000mm as a wheel size even if a lower value is chosen. This behavior is correct.
Note 4: If the value set by the selector seems to have no effect on the speed limit change, try to reset the TCU and to repeat the operations. There are 2 ways:
1. Try pressing the TCU on/off button for 10 seconds
OR
2. With bike off, press the power button and then hold down the mode change button for 10-15 seconds. Release the mode change button as soon as the battery display drops. The battery display will rise to current charge status and display the active mode. TCU is now reset.
If Levociraptor is not working, please follow these steps:
- Make sure you have plugged it in correctly.
- Please remove device.
- Switch bike on and ride for a few minutes then turn off bike for 5 minutes.
- Install Levociraptor unit (setting 4) and then reset tcu twice.


